When people first see direct-to-wall printing, one of the most common assumptions is that the image can simply run from one edge of the wall to the other — ceiling to floor, corner to corner.
In reality, wall printing doesn’t quite work that way. The result can still look like one large, seamless mural, but the printer itself needs physical room to operate. That means there are areas near ceilings, floors and adjoining walls that the machine can’t print into.
At Wall Envy, we think it’s better to explain that upfront. It means the artwork can be designed around the actual printable area from the beginning, rather than discovering limitations when the wall is finished and the artwork is already approved.
Is direct-to-wall printing really “seamless within the printable area
”?
Not literally.
You may see wall printing described online as an seamless within the printable area
process, but technically that isn’t an accurate description of how a vertical wall printer operates. Our MK02 printer needs clearance around the wall so the printhead, vertical mast, floor track and machine body can move safely.
The better way to think about it is that the architectural wall contains a printable area. Your artwork sits within that area.
Done properly, the result still looks like one continuous mural because there are no wallpaper panels, vinyl joins or overlapping sections. The image is printed directly onto the wall as one continuous graphic — it simply needs to be designed around the machine’s working area.
How much clearance does the MK02 need?
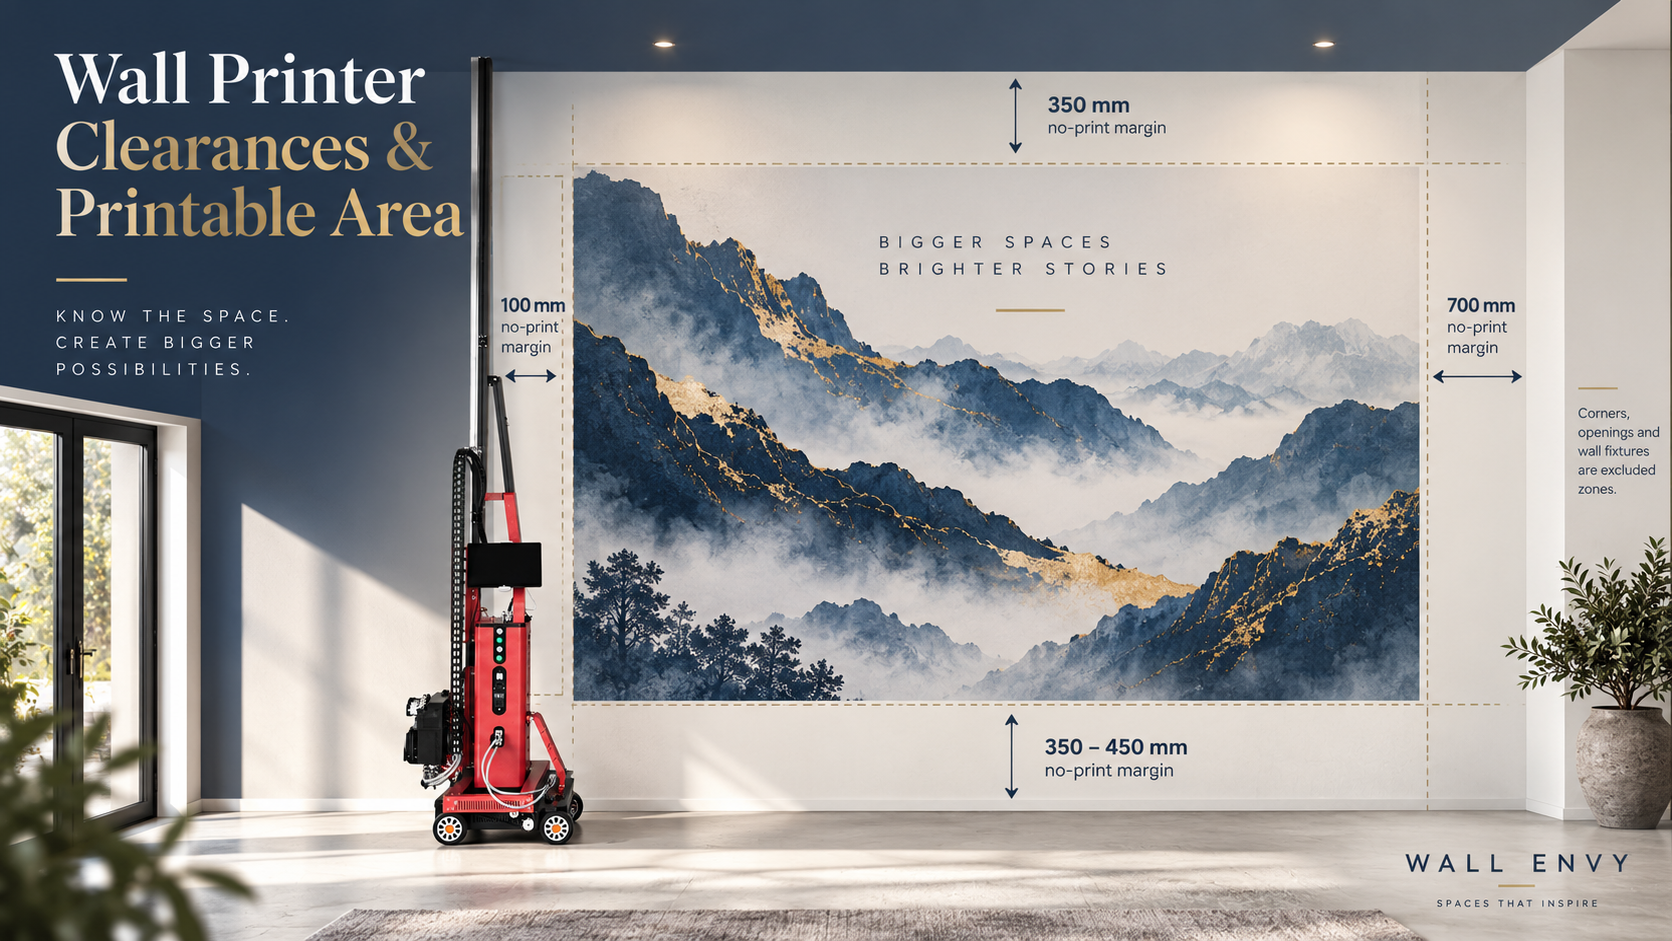
For initial design and planning purposes, we currently allow approximately:
- Ceiling / top: 350 mm
- Floor / bottom without floor rail: 350 mm
- Floor / bottom with floor rail: 450 mm
- Left-hand side: 100 mm
- Right-hand side: 700 mm
These figures should be treated as planning allowances rather than guaranteed final print dimensions. Every project is slightly different, and factors such as floor levels, wall geometry, access, obstructions and printer positioning can affect the final usable area.
That’s why Wall Envy confirms the actual printable zone during a site measure before final artwork dimensions are locked in.
Why is there more clearance required on the right?
This one often surprises people because the MK02 doesn’t require the same amount of clearance on both sides.
The printhead assembly operates on the vertical mast, while the main machine body and control components occupy more space on the right-hand side. As a result, approximately 700 mm of clearance is required on that side of the machine.
The printer can operate in the opposite direction if required, but reversing the print direction doesn’t make that clearance disappear. The machine body is still physically there.
This becomes important when artwork needs to finish close to a doorway, adjoining wall, cabinetry or another architectural element. If we’re involved before the artwork is finalised, moving or resizing the design slightly can often solve the issue very easily.
Can we print right up to the ceiling?
Not quite. The MK02 needs approximately 350 mm of clearance below the ceiling so the vertical printing system can operate without the mast or printhead assembly interfering with the ceiling.
In most situations, that doesn’t create a visual problem. A well-designed mural doesn’t necessarily need to touch the ceiling to feel like it fills the wall. The artwork can fade out, use negative space, finish naturally within the composition or simply use the existing wall colour as part of the overall design.
We actually prefer this approach in many Wall Envy concepts. Rather than placing what looks like a large rectangular picture onto a wall, we can design the artwork so the wall itself remains part of the finished result. It often makes the mural feel much more integrated into the room.
What about printing all the way to the floor?
This is where things get interesting for us.
There is also a lower clearance. Depending on the track configuration being used, approximately 350 mm to 450 mm needs to remain above finished floor level.
Again, this doesn’t mean the bottom of the mural needs to look unfinished. The design can transition into the existing wall colour, use scattered elements rather than a hard rectangular edge, or intentionally finish above skirting boards and other architectural details.
The important thing is simply knowing the limitation before the artwork is created.
Can direct-to-wall printing wrap around a corner?
No. The printer works on a flat wall plane and can’t continuously print around an internal or external corner.
If artwork is required across two adjoining walls, we treat them as two separate printable surfaces. The artwork can certainly be designed so the two walls relate to each other visually, but the printer must complete each wall separately and the required clearances still need to be maintained.
That’s another reason we avoid describing direct-to-wall printing as literally seamless within the printable area
. It isn’t about hiding limitations; it’s about understanding them and designing around them properly.
Our Services →
What happens around doors and windows?
Doors, windows and other openings become part of the artwork planning process.
The printer can’t simply print through a doorway and continue on the other side as though the opening doesn’t exist, so the artwork needs to be designed around it. Sometimes this actually creates an opportunity rather than a restriction.
For example, a doorway in a childcare centre could become the entrance to an illustrated scene. In a commercial space, branding or graphic elements can be positioned deliberately around windows or doorways so they become part of the overall design.
The important part is identifying those areas before the final artwork is prepared.
What about power points, pipes and wall fixtures?
The printable wall needs to be sufficiently flat and unobstructed for the printer to travel safely along it.
Power points, switches, exposed pipes, conduits, handrails, signage hardware and other protruding wall-mounted items can interfere with the machine and need to be treated as no-print zones.
This is where early planning becomes particularly valuable. If Wall Envy is involved during a commercial fit-out or renovation, there may be an opportunity to position services outside the main mural area before everything is installed.
It’s much easier to plan a clean printable area during construction than to discover afterwards that a power point, handrail or conduit is sitting in the middle of the proposed artwork.
Other FAQs →
Does the wall need to be perfectly smooth?
Not necessarily.
The MK02 can work with a range of architectural surfaces including plasterboard, painted plaster, concrete, brick, timber, MDF, glass, metal and tile, subject to the condition and suitability of the surface.
There is, however, an important difference between surface texture and an obstruction.
Minor variation in a wall is very different from having a pipe or fixture protruding from it. The printer’s sensing system helps maintain the correct distance from the wall over minor surface variations, but it doesn’t mean every heavily textured, unstable or obstructed surface is automatically suitable.
If there’s any uncertainty, we’d rather assess the wall or complete a test first than promise something that won’t produce the right result.
Why does this matter to architects and interior designers?
Because direct-to-wall printing becomes much easier when it’s considered during the design stage rather than being added as an afterthought.
Imagine a feature wall has already been built. The power points have been installed, a TV bracket is mounted, the architect has specified a handrail and joinery finishes close to one side of the wall. Then somebody decides they’d like one large mural covering the whole surface.
We may still be able to create something great, but much of the usable print area has already been determined.
Now imagine having the same conversation earlier in the project. We can identify the likely printable zone, confirm machine clearances and help the design team position services outside the areas that matter most to the artwork.
That gives everyone far more flexibility.
It’s also one of the reasons we created the Wall Envy Architectural & Interior Design Specification Guide — so architects, designers and builders can understand the requirements before construction is complete.
How does Wall Envy confirm the final printable area?
The process is fairly straightforward. We start by looking at the proposed wall, drawings or photographs and discussing what you’re trying to achieve. From there we consider the surface, access, wall dimensions and anything that could interfere with the machine.
For commercial and specification projects, a site measure allows us to confirm the usable printing area properly. Once that has been established, the final artwork can be sized and positioned accurately.
We can then create a digital mock-up showing how the design will sit on the actual wall before printing begins.
It takes a lot of the guesswork out of the process.
Get in Touch →
A limitation doesn’t have to limit the design
Every mural method has limitations. Wallpaper has panel widths and joins, vinyl relies on an adhesive layer, and hand-painted murals depend heavily on access, time and the artist’s process.
Direct-to-wall printing has machine clearances.
The important thing is understanding those limitations early enough that they become part of the design rather than becoming a problem when installation day arrives.
That’s how we approach wall printing at Wall Envy. We don’t want to tell people that a printer can magically reach every millimetre of every wall. We’d rather explain what it can actually do and then help create the best result within the space available.
Planning a feature wall?
If you’re an architect, interior designer, builder or business owner considering direct-to-wall printing, it’s worth speaking with us before the artwork is finalised.
Send Wall Envy a photo, drawing or basic wall dimensions and we can help identify the likely printable area, potential obstructions and any obvious access issues before the design gets too far down the track.
How Direct-to-Wall Printing Works →
← Back to Blog